NICU Nurse, Mama Heart. Here for every tiny step.


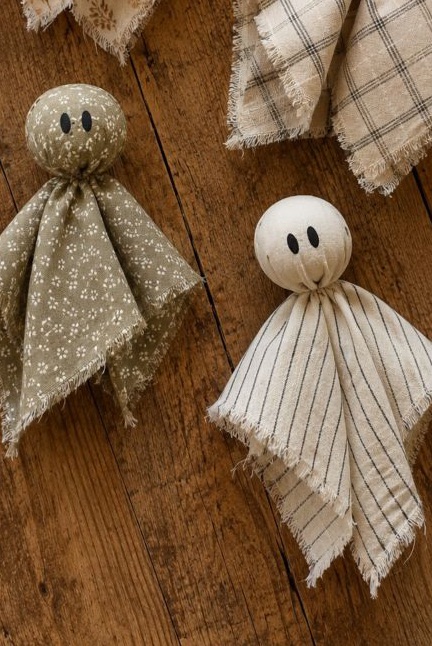
If you’re looking for a cozy, neutral Halloween decoration that’s adorable instead of spooky, this DIY fabric ghost garland is the perfect project! It only takes a few supplies, is budget-friendly, and best of all—your little ones can help create their own tiny ghosts.
Hang it on a mantel, across a shelf, over a window, or on your front porch for the sweetest touch of fall.
Supplies You’ll Need
- Wooden craft balls with holes (about 1–1.5 inches)
- Cotton balls, wool roving, or small stuffing pieces
- Neutral fabric scraps (gauze, muslin, linen, cotton, or floral prints all work beautifully)
- Black felt or black vinyl
- Hot glue gun (adult use only)
- Scissors
- Twine, jute string, or thick embroidery thread
- Large embroidery needle (optional)
How to Make the Fabric Ghosts
Step 1: Cut Your Fabric
Cut squares of fabric about 6–8 inches wide (or bigger if you want bigger ghosts). Mix different neutral colors and floral patterns for a cozy vintage look.

FABRIC Click the image for the link

Click the image for the link!
Step 2: Make the Ghost Head
Place a cotton ball (or form a ball with poly fill stuffing) in the center of the fabric. Pull the fabric around it to form the ghost’s head.

Click the image for the link
Step 3: Secure It
Wrap a thin strip of matching fabric or a small piece of twine tightly around the neck and tie a knot. Trim any excess.

Click the image for the link
Step 4: Add the Face
Cut tiny oval eyes from black felt (or use black paint or a permanent marker) and glue them onto the fabric.

Click the image for the link

Click the image for the link
Step 5: Create the Garland
Thread twine through the holes in each wooden bead using a large needle. Space the ghosts evenly and tie a small knot behind each bead to keep them from sliding.
No needle? Simply hot glue each ghost onto a length of twine for an even easier version.

Click the image for the link

Click the image for the link
Ways Kids Can Help
This is such a fun project for toddlers and preschoolers!
They can:
- Pick out their favorite fabric patterns.
- Help fluff the cotton balls.
- Hand you the fabric pieces.
- Draw ghost faces with a black marker (for older kids).
- Decide the order of the ghosts on the garland.
- Count the ghosts as you string them together.
Leave the hot glue and needle threading to the grown-ups, and you’ve got a safe, memorable craft the whole family can enjoy.
Make It Your Own
Try adding:
- Tiny felt bows for “girl” ghosts
- Mini pumpkins or wooden beads between ghosts
- Dried orange slices
- Eucalyptus or faux fall leaves
- Bells or wooden stars
- Soft sage, rust, cream, and oatmeal fabrics for a modern farmhouse look

Click the image for the link

Click the image for the link
Final Thoughts
Homemade decorations always make a home feel extra cozy, and this sweet ghost garland is one you’ll look forward to pulling out every fall. It’s simple enough to make in an afternoon and creates memories your kids will remember long after Halloween has passed.
For more festive, fall craft ideas you can make with your kiddos, check out my post: 20 Fall Handprint and Footprint Crafts to Make with Kids – Tiny Steps Home
Affiliate disclosure: This post contains affiliate links, which means I may earn a small commission- at no extra cost to you- if you choose to make a purchase through them. I only recommend products and services I genuinely use or believe may be helpful.
